NEW BLOG!

This is an out of date blog, for these posts and all current projects please head over to

I'm Topsy Turvy

for any interest in ordering cakes please head to

topsy turvy cakes
Showing posts with label just for fun. Show all posts

February 28, 2010

Luncheon

I was asked by the ward I live in to make two cakes for a luncheon with the stake.  (ever ward donated 2 cakes each).  They were used as the center pieces for the luncheon and then eaten at the end.  While the cakes didn't need to be fancy I figured any time I get to make a cake with no set design I might as well try something I haven't done before.  For the first cake I went with this swirl design.  It seemed simple enough in theory.  But it's just so DRY here in UT.  I had to try it 4 times before I got the swirls to actually stay stuck to the fondant wrap.  I think next time I'll use a humidifier in the room with me and see if that goes better. 
fondant swirl cake ruffles
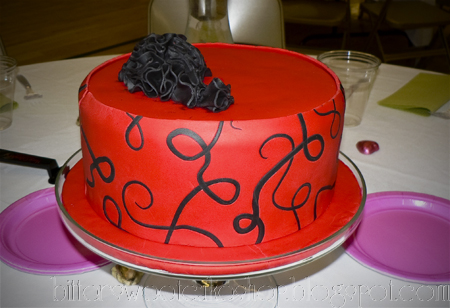
For the second one I wanted to try this fondant ruffle cake I'd seen.  Of course when I went to go find a picture of the cake I was thinking of I couldn't find it anywhere.  I guess I need to figure out some new search words, and save pictures I like better for inspiration.  I'm not pleased in how this one turned out. 
ruffled edge fondant cake royal icing stencil
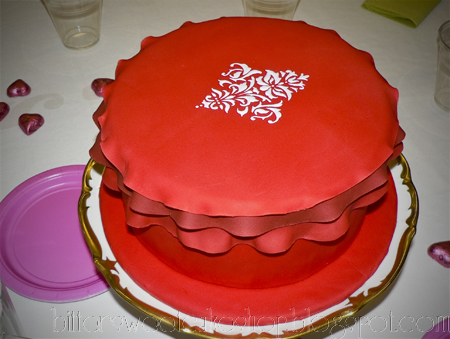
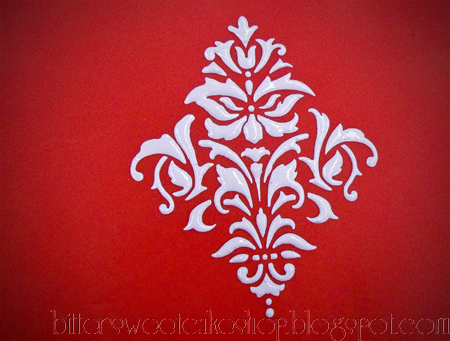
It was missing something, a big flower topper or something, so I decided to try my new stencil with royal icing technique again.  I used a different stencil this time.  I LOVED the way this turned out, and wished I had just done this around the whole cake instead.  Oh well.  I think I figured out how to make the ruffles work better next time.  I need a larger ball tool, and larger foam pad.  I still think it could be really pretty, so I'll try it again sometime.
royal icing stencil cake fondant
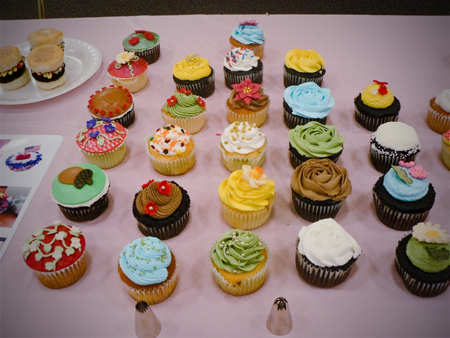
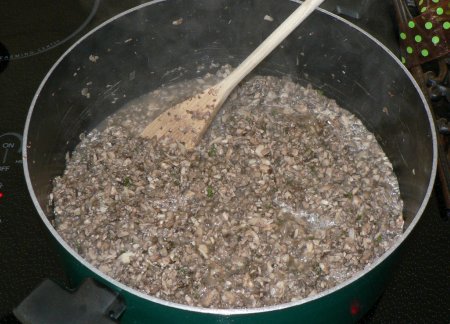
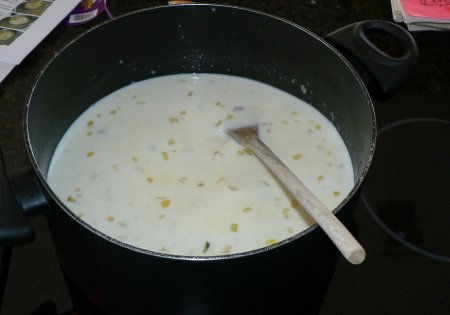
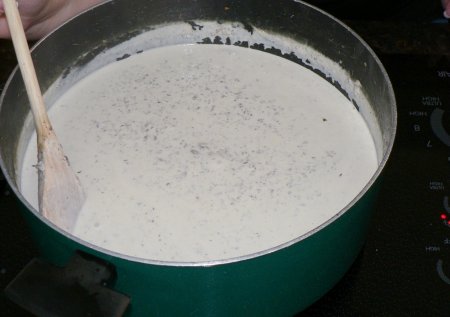
In the end of course they were way fancier than they needed to be.  But I got rave review for how they tasted, and in the end that's really the most important part.  What's the point of a nice looking cake if it's not completely delicious?  I decorate for myself, I enjoy it and find it fun.  So while I'm glad people like the cakes I decorate, I'm more pleased when they like how it tastes.   I used my Favorite chocolate cake and my pistacho Mousse recipe for filling.  With Ganache frosting.  My favorite combination!

December 22, 2009

It's that time of year...

Goodie Plates!!!!  Someone commented to me that I make too many things, that they wouldn't go to all the work.  But then I thought.  If I only made a few things, but still took around the same amount of plates, there wouldn't be very many leftover's for me!!!  I'd rather make all my favorites (let's face it I was going to make them all anyway) and double the recipe (no extra time that way) and have plenty for plates AND my own enjoyment!  Plus it isn't hard, just time consuming, and OH so worth it!  So here is the set up around the island while I'm making the plates.
091220_0007_edit
A sample plate.  I should have gotten bigger plates so I could have fit 3 of each thing (but that mean's less for me... hmmmm maybe these plates were the perfect size).  So we have (starting from the top and going counter clockwise) Sugar cookies, caramel brownies, candy cane marshmallows, peanut butter squares, almond brittle, sandies and chocolate pecan fudge.  I didn't get around to making truffles, but they wouldn't have fit on the plate very well.
 091220_0015_edit
And here is Tonight's round of plates.  I'm sure I'll be making some more (you always want one for that person that drops off a plate that you weren't expecting to so you can reciprocate right away) and Santa has to get one...  And since I know I'll get some request's for recipes see below.  I'll be posting each recipe for your enjoyment!  Merry Christmas!
091220_0017_edit

Candy Cane Marshmallows

091220_0014_edit
I have to give credit to Martha Stewart for this one! You can find it on her site here. They turned out great. My 2 1/2 year old can't stop eating them and they are great in my homemade hot chocolate. Pretty too! I'm not sure if I am allowed to reproduce it here so if someone knows one way of the other just tell me. For now here is the recipe (in her words, not mine- I like my recipes short and to the point).

Candy Cane Marshmallows

2 cups sugar
1 tablespoon light corn syrup
4 packages (1/4 ounce each) unflavored gelatin
3/4 teaspoon peppermint extract
2 large egg whites
2 teaspoons red food coloring
1. Coat an 8-inch square pan with cooking spray; line bottom with parchment paper. Coat the parchment with cooking spray, and set pan aside. Put sugar, corn syrup, and 3/4 cup water in a small saucepan. Cook over medium heat, stirring, until sugar is dissolved. Stop stirring; let mixture come to a boil. Raise heat to medium-high; cook until mixture registers 260 degrees on a candy thermometer.
2. Meanwhile, sprinkle gelatin over 3/4 cup water in a heatproof bowl; let stand 5 minutes to soften. Set the bowl with the gelatin mixture over a pan of simmering water; whisk constantly until gelatin is dissolved. Remove from heat, and stir in extract; set aside.
3. Beat egg whites in the bowl of an electric mixer fitted with the whisk attachment until stiff (but not dry) peaks form. Whisk gelatin mixture into sugar mixture; with mixer running, gradually add to egg whites. Mix on high speed until very thick, 12 to 15 minutes.
4. Pour mixture into lined pan. Working quickly, drop dots of red food coloring across surface of marshmallow. Using a toothpick, swirl food coloring into marshmallow to create a marbleized effect. Let marshmallow stand, uncovered, at room temperature until firm, at least 3 hours or overnight. Cut into squares.

Sugar Cookies

091220_0008_edit

These are actually from my Grandma Houghtaling. My mom talks about how she always had some of this dough in the freezer ready for a batch. But since my mom and her siblings would sneak some every so often that by the time Grandma pulled out some dough there wasn't much left. I have about 120+ different cookie cutters and my kids and I make these cookies for EVERY holiday. My husband complains that the peppermint icing should only be for Christmas so I do experiment with other flavors, but my favorite is still the peppermint I grew up with. I use these 13x20 pans for my kids to decorate on, it catches the extra sprinkles which I pore into a misc sprinkle bag that they love to use up, you can see the misc sprinkles on the trees above.

Sugar Cookies
3 ¼ C flour
1 tsp. baking soda
½ tsp. salt
1 tsp. nutmeg
1 tsp. baking powder
½ C Butter and margarine
1 C sugar
1 egg
1 tsp. vanilla
½ C thick sour cream
Sift flour, soda, salt, nutmeg and powder. In separate bowl cream butter, sugar, egg, vanilla, sour cream. Mix in dry ingredients. Chill in fridge for 3-4 hours roll out to 1/4 inch cut into shapes. Cook at 350 for 15 mins

Frosting
4 ½ C powder sugar
¼ C milk
1/3 C butter
1 ½ tsp vanilla
1 tsp peppermint extract
Food coloring (optional)
Mix butter, powdered sugar, milk, vanilla and peppermint add more milk if needed

The secret is in the thickness of the cookie's, don't be stingy when you roll them out. The dough can actually stay good in the freezer for months (if it last's that long without being eaten!). For icing flavors I've tried almond and been happy with it, and even substituted some of the milk for a flavored creamer and had success. So ENJOY! The decorating possibilities are endless.

Caramel Brownies

091220_0013_edit
My ABSOLUTE favorite. I made a second pan of these just so I could eat one myself! My mom always made these, and my sister's and I love them. I can't imagine Christmas without at least one batch of these. I've made them during the year at times, but something about them just feels like Christmas too me. I'm not sure where my mom got this recipe, but it's the only thing I use a box mix for anymore. This year I couldn't find caramel squares ANYWHERE. So I used the new caramel dot things. They actually are a few ounces smaller than the old caramel square bags were but my husband liked it better with less of the caramel. I also use less chips. I just like the balance better myself, but to each his own!

Caramel Brownies
½ C evaporated milk
50 unwrapped caramels squares (about 14 oz)
½ C evaporated Milk
1 package German chocolate cake mix
¾ C butter melted
1 C walnuts chopped (I prefer pecans but I think my mom and sisters would have a heart attack if I actually changed the recipe to SAY pecans)
12 oz Chocolate chips
Mix ½ C milk, cake mix, butter, and walnuts. Press 2/3 dough in bottom of glass pan (9x13) cook at 350 for 6 mins. In sauce pan melt ½ C milk and caramels pour over cooked crust. Sprinkle chocolate and rest of dough on top cook 15-20 min at 350

Peanut Butter Cup Squares

091220_0012_edit
I actually got this recipe from my Aunt Lynne years ago. I'm not really into peanut butter, but these are my husbands favorites. In fact I made a batch last week for a cookies exchange and it only lasted one day. So I made another batch and it's actually already gone too! Lucky it's so easy to make, I think I'll make him another one tomorrow. My chocolate actually tempered very well, and was cooling perfectly right up until the very end. I made these too late in the evening and the FREEZING temp's here in UT ruined my nice looking finish, but hey, they still taste great, right?

Peanut butter cup squares
1 ½ pkg graham crackers crushed
1 lbs powdered sugar
1 C melted Butter
½ C peanut butter
Mix all together and press into buttered 9x13 pan. Top with 12 oz milk chocolate chips melted. Refrigerate.

Almond Brittle

091220_0011_edit
This is a family favorite. My mom always made two batches. The first never seemed to work, but the second always did. We always thought that it was weird, but couldn't figure it out. Then I moved to AZ! Dry, DRY desert, and it worked EVERY TIME. Perfectly. It also worked in UT. Then I moved to TX and it NEVER worked. Turns out candy making is affected a lot by the barometer range. SO if it's going to rain DON'T bother! In the house we're in now we actually bought and installed a whole house humidifier. While it's nice for our nose/throats/etc... It doesn't help with candy making much. This batch started to separate right before I was about to pour it out! FRUSTRATING. But I caught it JUST in time and after soaking up the separated butter it turned out almost perfect! Not at all grainy, very crunchy, really quite nice! One of the FEW nice things about dry places (I still prefer humidity, but it is nice to get to make this treat this year).

Almond Brittle
1 C butter
1 C sugar
1 C chopped almonds
King size Hershey bar chopped
Mix butter and sugar in sauce pan heat till at “Cracked Stage” on candy thermometer or when caramel colored and smoking. Mix in Almonds. Pour onto cookie sheet spread chocolate on top and finely chopped almonds

Fudge!

091220_0010_edit
My mom loves fudge, but we've never found a successful recipe that we could count on. Then a few years ago she found a box mix for fudge! You read that right, a box mix for fudge, AND it not only worked it tasted GREAT! So I bought a box, measured out everything (from the prepackaged baggies) and created this recipe. Easy, quick and, so far, perfect every time! I double the recipe and use a 9x13, but just so you know it's a VERY thick fudge, I might use 2 pans next time.

Chocolate pecan fudge
3 cups semisweet chocolate chips (or a mixture of semisweet and milk chocolate)
1/4 cup butter
1 (14 ounce) can sweetened condensed milk
1 tsp vanilla
1 cup chopped pecans (optional- you can also use walnuts)
Place chocolate chips, sweetened condensed milk, and butter or margarine in large microwaveable bowl. Zap in microwave on medium until chips are melted, about 3-5 minute, stirring once or twice during cooking. Stir in nuts, if desired. Pour into well-greased 8x8-inch glass baking dish. Refrigerate until set.

Sandies

091220_0009_edit
You might also know these as Mexican Wedding Cookies. I've heard a few other names for them too. Everywhere I move I have to learn new names for recipes and ingredients I use often. But these are also from my Grandmother. She grew up in Mexico and has a lot of wonderful recipes. These are very delicate when they come out of the oven so be careful when you cover them with the powdered sugar. Of course if some break feel free to eat them!

Sandies
1 C butter
¼ powdered sugar
2 tsp vanilla
1 Tbs water
2 C sifted flour
1 C chopped pecans
Cream butter and sugar. Add vanilla and water, mix. Add flour, mix. Add pecans, mix. Form balls bake at 300 for 20 min, while hot roll in powdered sugar

October 13, 2009

Cupcake class

For a Church activity this week for the women I was asked to demonstrate and teach different way's to frost cupcakes. I pre-made 40 cupcakes and decorated each of them a bit differently showing different options you could have.
cupcakes styles various tips frosting how to flowers fondant
The only one I ran out of time for (and wouldn't have had time to teach anyway) was dipping the cupcake in poured fondant. But overall I was pleased. Then during the class I showed them how to used 4 different tips, 2 ways each, to create different looks, like this closed star tip:
cupcake closed star tip dagrees
Versus this one made with the same tip! I was trying to teach easy things to recreate, so I didn't teach making a rose, but this rosette is an easy to make great looking alternative! It was my husbands favorite.
cupcake rose rosette closed star tip
I also showed them how to cover a cake with frosting and fondant. And I got to use my new toys, my impression mats! I made all of these in one night, and while I'm happy with most of them, there are some that I would have redone if I hadn't just been demonstrating and teaching. Doing 40 different cupcakes in 40 different ways was very time consuming!
cupcake fondant impression mats flowers vines
Luckily I had a bunch of my extra royal icing flowers left that I was able to use! They really add a nice touch to cakes and cupcakes sometimes! I was just relieved not to also have to make 40 different toppers for the cupcakes! If I had more time to teach there are some other things I would have liked to demonstrate, like creating your own fondant topper, but keeping things simple and down to 45 mins with a Q&A was hard. I was really pleased with how well the class went. I was surprised how nervous I was, but it went well.
dafadil cupcake frosting star tip royal icing

September 03, 2009

Ravioli

Today I finally broke out my pasta machine and the new ravioli attachment! I experimented with a few different thicknesses and decided what I really liked. So I can't wait to try it again! It went great, and quicker than I expected! So YAY! I'm making another batch next week!
ravioli three cheese homemade pasta

June 27, 2009

Canning!!!

Our church places a huge emphasis on food storage, and that leads to a lot of canning. Although my mom never ever EVER canned. So I never learned and it seemed very daunting. I've always wanted to try, but I'm not really a jam eater, or fruits and veggies for that matter. So I never thought there was anything for me to can. But when my close friend bought a pressure cooker and decided to try it I thought I would join her. And when the opportunity came up for 60 lbs of organic tomatoes (each) we decided to make a day of it (that turned into two!)
Here are my supplies (above) and our tomatoes (below).
The first thing we decided to make was pizza sauce, it had to simmer for awhile so we figured we should start it first. It was a LONG process. First boiling tomatoes then straining them to get rid of the seeds and peels. It was long and messy.
THEN adding the herbs/spices and boiling/simmering it down to HALF. We thought it would take a few hours, but it turned into like 6-8 hours! It was 2 am before I was done! CRAZY! Looks good though, huh?
While that was simmering away we decided to make a salsa. Check out all these chopped tomatoes! Looks good huh? (not really, I don't even LIKE tomatoes! But I like tomato based stuff like what we're making).
This one was a Spicy Salsa. Neither of us are into chunky salsa, but that's what the canning book called for. We couldn't risk blending it up and messing with the balance for canning purposes. So we'll blend it up when we open them (hoping that we'll actually HAVE power and a blender when we open them and it isn't the "last" days, he he he!)
This was not pressure canning, but water canning???? I don't really understand it all, but just followed the instructions!
Here are the first day's cans, pizza sauce, and spicy salsa!
The next day went MUCH faster, this was the Zesty Salsa! And with that I was out of tomatoes (I did double batches of my three recipes.)
And finally we ended our canning run with a tomatillo salsa! This one we made together and it went AMAZINGLY fast. We probably should have done a few of the others together, oh well, live and learn.
And the end product of two days, it doesn't look like much, but we don't go through that much salsa, so it is at least a years worth (they only last a year, so it IS a year supply whether we eat it all or not). And we make a lot of white pizza, but not red, so that will be fun too! Yeah for me!

June 17, 2009

Cheese making

Today my friend and I tried our hand at making CHEESE! We started out by making Mozzarella! We tried two different recipes. Mine was a "20 min mozzarella" that took a few hours! But hers was a few hour one that totally didn't work! CRAZY! But mine turned out great!
The process of cheese from a gallon of milk was fascinating! The cheese cloth died a sad death after the cheese making. I think it's because it was a softer cheese, maybe a cheese muslin would work better. Or another 30 mins wait time, and more draining time, instead of a rush and squeeze job.
After we separated the curds into mozzarella we took the whey and made whey ricotta! Amazing that after all that we could still get more cheese out of it. For cheese making you bring it up to a certain temp, add something (in this case a vinegar) and let it react and sit creating the separation of curds and whey.
See the reaction? Look closer... The little clouds? At first we couldn't see it, but it was awesome!
Look how much we got! Since we ruined the cheese cloth (and it would have been to wide) we used a towel lined with paper towels. A cheese muslin would be perfect for this. After it drained I added a bit of salt (you could also add herbs) and it was perfect! LOVED it! I wish it had made a bit more, it wasn't enough to make anything out of. Next time I'll make some cheese ravioli out of it.

June 13, 2009

Iron Chef- Bacon and Chocoalate

Tonight was another Iron Chef. The secret ingredient was Bacon (prosciutto or panchetta was also allowed) but since Bacon isn't a great dessert item they (last month winners) choose Chocolate as well. I made my Penne Rustica (it has smoked prosciutto in it).
It's been one of our family favorites for years now. I made one HUGE mistake. I made enough for the kids to have for their dinner as well. So I mixed it all up and served them just before we left, but then the pasta sat in the sauce for over half an hour before everyone else got some and most of the creamy sauce was absorbed. If I had only mixed a bit for the kids and waited to mix the rest until right before there would have been more sauce and I think it would have gone over better.
There was a bacon dip, a chicken stuffed with bacon, bacon wrapped asparagus, bacon rice (two different dishes), salad with bacon and then chocolate pie, mud pie, cream puffs, my BEST EVER chocolate Ice Cream as well as an eclair dish that I forgot to get a picture of!
The winner was a bacon pasta dish that was VERY similar to mine, but had a lot more sauce left... GRRRRR I think I might have had it but for that one mistake!
Since we're moving next month this was our last one to attend. I'm sad, and totally going to miss it. So wherever we end up moving I'm totally going to start one! I've LOVED it! Thanks everyone, I can't wait to get the cookbook at the end of the year!

June 12, 2009

Cream of Mushroom soup

This week we decided to try to find a good cream of mushroom soup recipe. Not because we're into mushroom soup, actually neither of us are into mushrooms, but because we want a substitute for the canned stuff, for gravy's and casseroles.
chopped button mushrooms for homemade soup
We made two different recipes, but they both called for a while lot of button mushrooms. My recipe called for chopped, while she was able to use food processor on her mushrooms.
mushrooms simmering homemade soup
Mine started with a creamy sauce with leeks and other veggies. Simmered for 45 mins and FINALLY add the mushrooms.
cream of mushroom soup start
The mushrooms were barely cooked and while the soup had a great flavor it wasn't mushroom. Certainly not a substitute for the canned stuff. It was too chunky for me, so we ground it up in the blender, and it helped get it closer to what we were looking for but not perfect.
cream of mushroom soup bad
This recipe was completely opposite. It started with the mushrooms, dry, simmering until it created it's own juice. It was amazing how much juice it created..
mushrooms simmering homemade soup
See? Once it got to this point THEN the cream and stuff was added. It was a great substitute, JUST the right flavor, but the chunks were too much, so we ran it through the blender and voila! PERFECT! It could have been a bit thicker, either simmering longer, or maybe draining some of the juice before adding the cream and stuff. I'm not sure, add some other thickener maybe. But it was great, and I'm looking forward to using it next time I make my pork chops!
cream of mushroom soup homemade good
Cream of Mushroom Soup
serves 4
1 lbs white mushrooms
1 Tbsp lemon juice
1 Tbsp butter
2 Tbsp minced shallots
1 Tbsp chopped fresh thyme
1 tsp salt
1/2 tsp pepper
2 C cream
1 1/2 C chicken stock
1 tsp cornstarch, dissolved in 1 Tbsp water
In a food processor coarsely chop mushrooms and lemon juice. Melt butter in sauce pan and lightly saute shallots on med heat. Add mushrooms, thyme and bay leaf. Saute over low/med heat for 10-15 mins, until the liquid that is released from the mushrooms disappears. Add salt, pepper, cream and chicken stock, bring to a boil. Reduce heat and simmer for 20 mins. Add cornstarch and simmer another 10 mins, stirring constantly, add more seasonings and lemon juice to taste.